Measuring Made Easy
Our helpful hot-to-guide will walk you through the measuring process
How To Measure
Instructions for Blinds and Shades
Measuring Instructions - Window Blinds or Shades
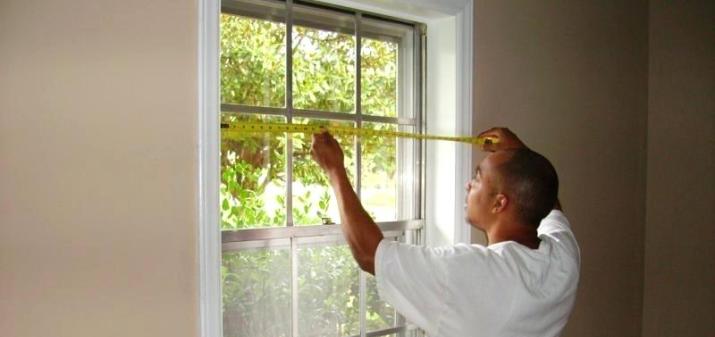
- Use a metal tape for accurate measurements
- Measure to the nearest 1/8"
You can mount your blinds or shades inside the window opening or casing or outside mounted to the wall above the window. Make sure to take into account any obstructions such as window cranks or cabinets.
In order to mount the blinds or shades inside a window opening or casing, make sure you have enough window depth. The depth needed for all products is listed on the specification tab on every products page.
May vary by product see product specifications for detailed information.
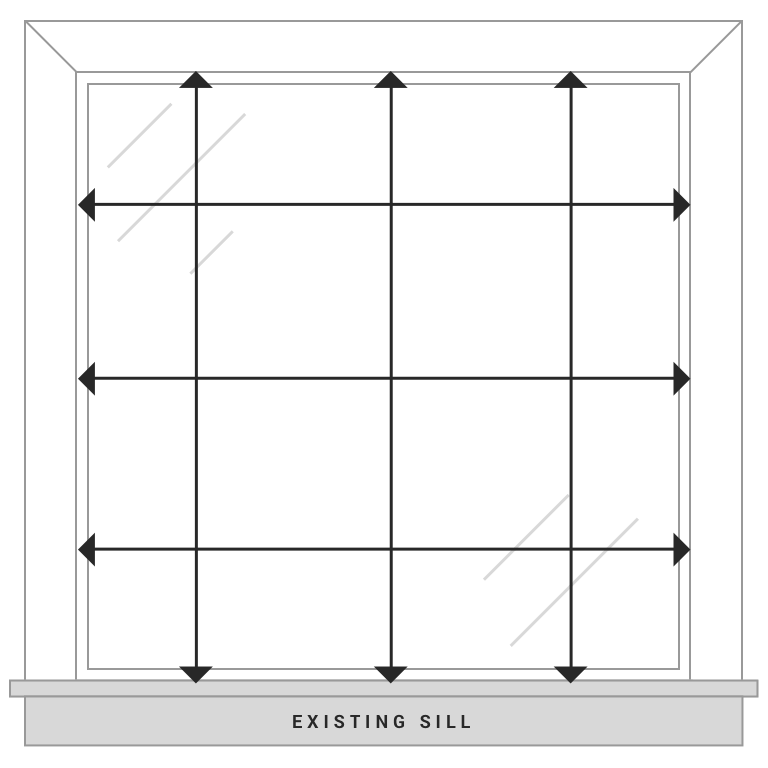
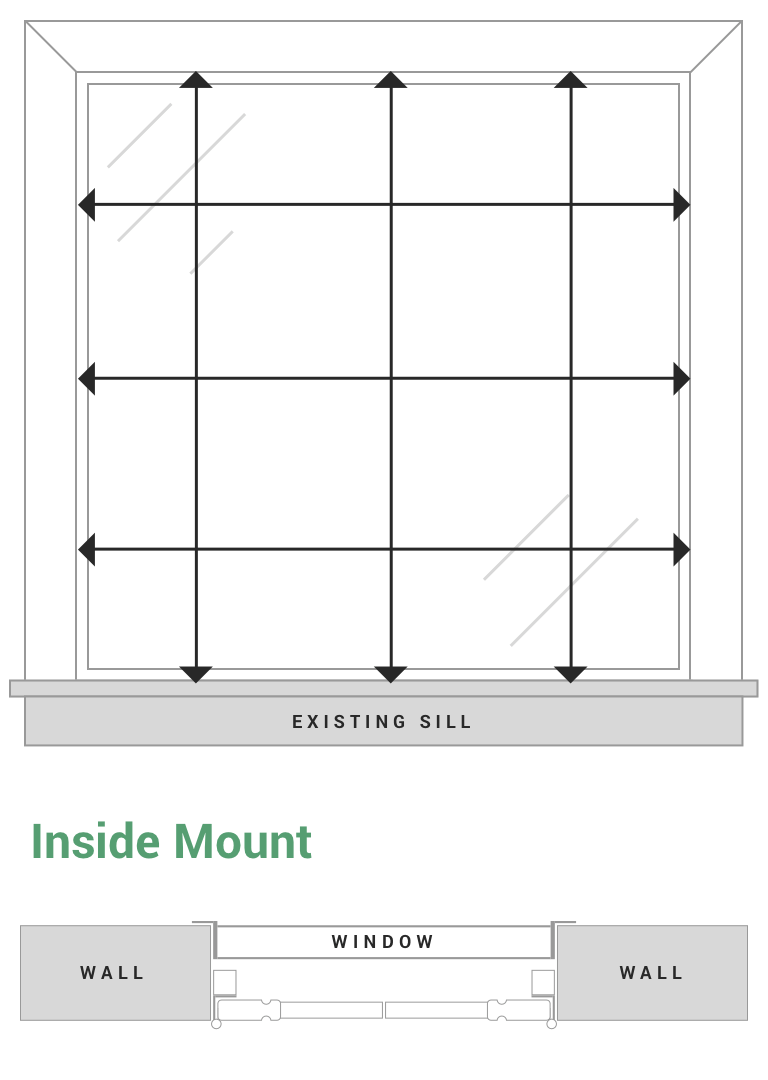
Inside Mount Window Blinds and Shades
- When mounting blinds inside the window opening or casing.
- Measure the exact width inside the window opening or frame in 3 places. Use the smallest dimension. Make no deductions the factory will make a small deduction to assure proper operating clearance.
- Measure the exact height inside the window opening or frame in 3 places. Use the longest dimension. (Use the shortest dimension for Vertical Blinds, Roman Shades & Roller Shades).
- Enter exactly what your window opening or frame measures. Take NO deductions.
- Ensure you have enough window depth.
See individual products for details. The factory will take proper deductions to fit the size window you specify. Please note some products will require more of a deduction to allow for mounting hardware.
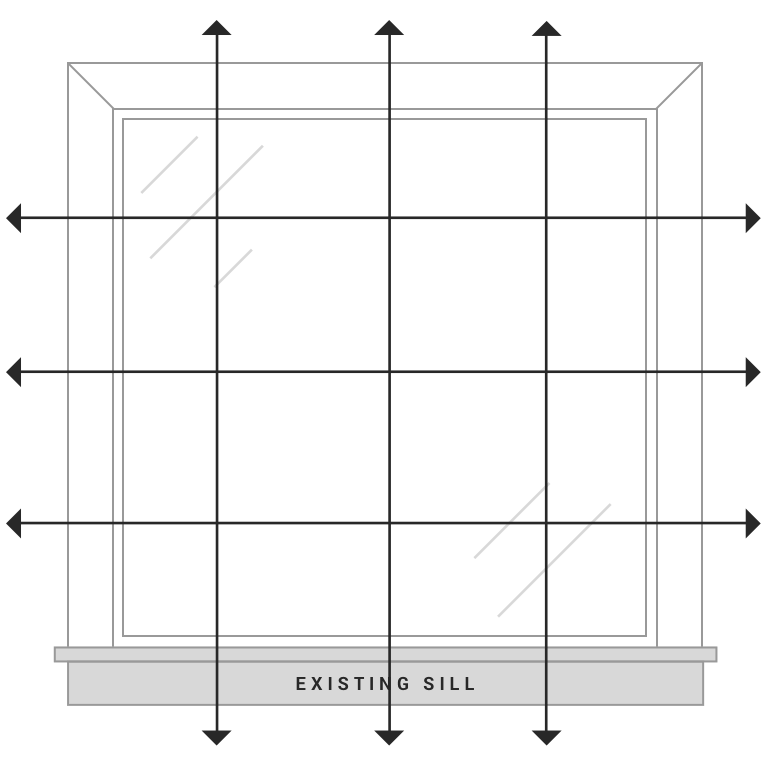
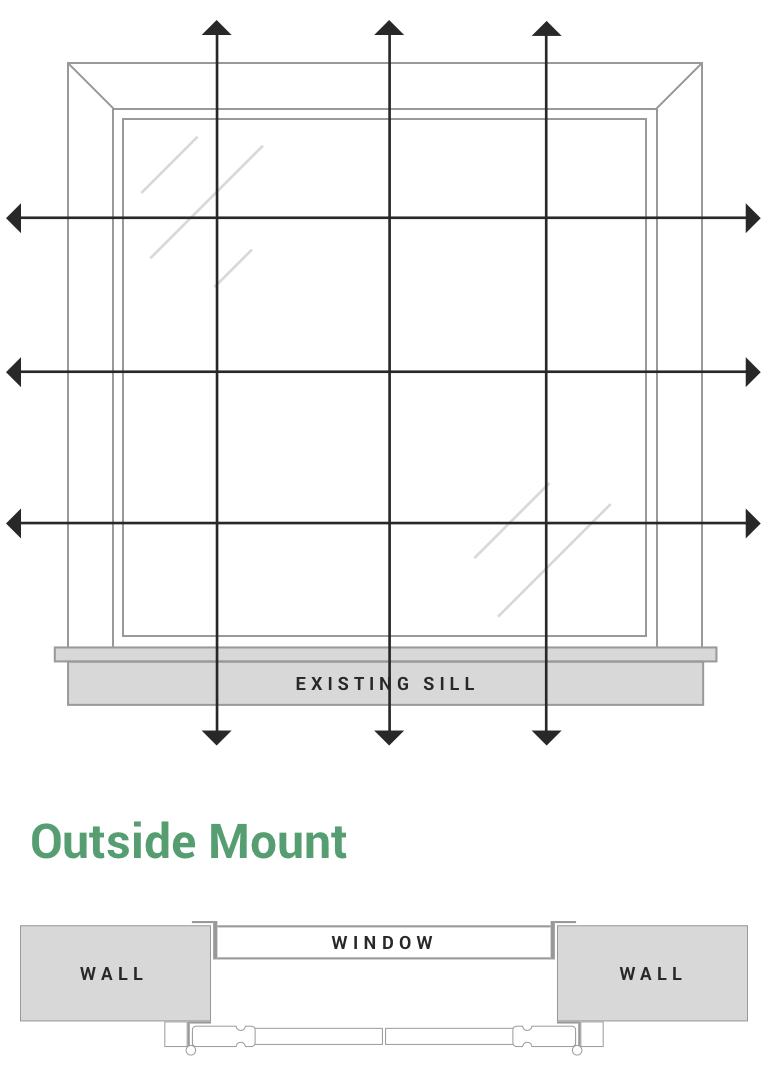
Outside Mount Window Blinds and Shades
When mounting blinds outside the window opening or casing.
- Measure the exact width the blind or shade will cover. This should include desired overlap, the more overlap you add the better privacy and light control you will have. (Minimum recommended overlap is 2" per side.)
- Measure the exact height the blind or shade will cover. This should include desired overlap, the more overlap you add the better privacy and light control you will have. (Minimum recommended overlap is 2" top and bottom.)
The factory will take NO deductions or make any additions on outside mount blinds or shades. The size you enter will be the finished size of your blind or shade. You MUST add for overlap desired.
Shutter Measuring Instructions
Note the size you order will be the finished outside frame size of your shutter from outside edge to outside edge. You must deduct from the width and height of your opening for needed clearance if you are doing an inside mount shutter. If you are doing an outside mount shutter you must add your desired overlap to all four sides.
- Use a metal tape for accurate measurements
- Measure to the nearest 1/8"
- All specialty shutters such as arched windows receive a confirmation drawing prior to production so you can double check your sizes and specifications to make sure everything is perfect.
STEP 1: Determine Type Of Mount-We strongly recommend outside mount for shutters.
Shutters may be mounted either inside the window opening or casing or outside the window opening or casing to the wall or molding. There are 2 factors that determine whether an inside mount is possible.
- Window Frame Depth
- Window Frame Squareness
* Only the Beaded L-frame may be mounted inside your window opening.
Window Frame Depth
Inside Mount (L-frame only):
- L-frame with 1 7/8" louvers - 2"
- L-frame with 2 1/2" louvers - 2 1/4"
- L-frame with 3 1/2" louvers - 2 1/2"
- L-frame with 4 1/2" louvers - 3"
Inside Mount (Z-frame only):
- Z-frame with 1 7/8" louvers - 1 3/4"
- Z-frame with 2 1/2" louvers - 1 3/4"
- Z-frame with 3 1/2" louvers - 2 1/8"
- Z-frame with 4 1/2" louvers - 2 5/8"
Outside Mount:
- L-frame with 1 7/8" louvers - 0"
- L-frame with 2 1/2" louvers - 1/4"
- L-frame with 3 1/2" louvers - 1/2"
- L-frame with 4 1/2" louvers - 1"
- 2" Decorative Frame with 2 1/2" louvers - 5/8"
- 2" Decorative Frame with 3 1/2" louvers - 1 1/8"
- 2" Decorative Frame with 4 1/2" louvers - 1 5/8"
- 3" Decorative Frame with 2 1/2" louvers - 5/8"
- 3" Decorative Frame with 3 1/2" louvers - 1 1/8"
- 3" Decorative Frame with 4 1/2" louvers - 1 5/8"
In order to mount shutters inside a window opening or casing, make sure you have enough window depth. Make sure to take into account obstructions such as window cranks.
Window Frame Squareness
In order to determine if your window is square, measure the window diagonally from bottom left corner to top right and bottom right to top left. If the 2 measurements differ by more than 1/2" we recommend an outside mount shutter. Outside mount shutters are mounted to the wall outside the window frame therefore they will account for your window being out of square. Make sure to take into account obstructions such as, window cranks, tile, levers, cabinets and inward opening windows or screens.
Inside Mount - Only when using Beaded L & Z-frames.
- Measure the exact width inside the window opening or frame in 3 places. Use the smallest dimension.
- Measure the exact height inside the window opening or frame in 3 places. Use the shortest dimension.
- Deduct how much clearance you want, we recommend at least -1/4" for width and height. You will need to caulk or fill in any gaps between your shutter and window frame.
- Ensure you have enough window depth. See depth chart above.
The factory will take NO deductions or make any additions to the size you enter. The size you enter will be the finished size of your shutters. You MUST deduct for needed clearance. See frame type on product page for more details and diagrams on how frame will fit.
Outside Mount
- Measure the exact width the shutter will cover. This should include desired overlap. this will vary depending on the frame you are ordering. See frame type on product page for more details and diagrams on how frames will fit.
- Measure the exact height the shutter will cover. This should include desired overlap. If you are mounting on top of an existing window sill and ordering the shutter to sit on top of that window sill add overlap to the top only. We recommend either a 3 sided frame with a sill bottom to sit on top of the window sill. Your height should be from your window sill to where you want the shutter to go up to.
- Make sure to account for any window sills, if your window sill sticks out past the wall or window casing your shutter should sit on top of the window sill as indicated in step 2, not go below it. If you would like the shutter to go below a window sill that sticks out call our customer service department. The amount of overlap recommended depends on the type of frame you are ordering.
Overlap:
For outside mount shutters you need to add to your window opening size the proper overlap so the shutter goes past your window opening. L-frame - Add 2" to all four sides. 2" Decorative Frame - Add 2" to all four sides. 3" Decorative Frame - Add 3" to all four sides. If you are resting your shutter on top of a window sill do not add the overlap to the bottom. The factory will take NO deductions or make any additions to the size you enter. The size you enter will be the finished size of your shutters. You MUST add for overlap desired. See frame type on product page for more details and diagrams on how frames will fit.
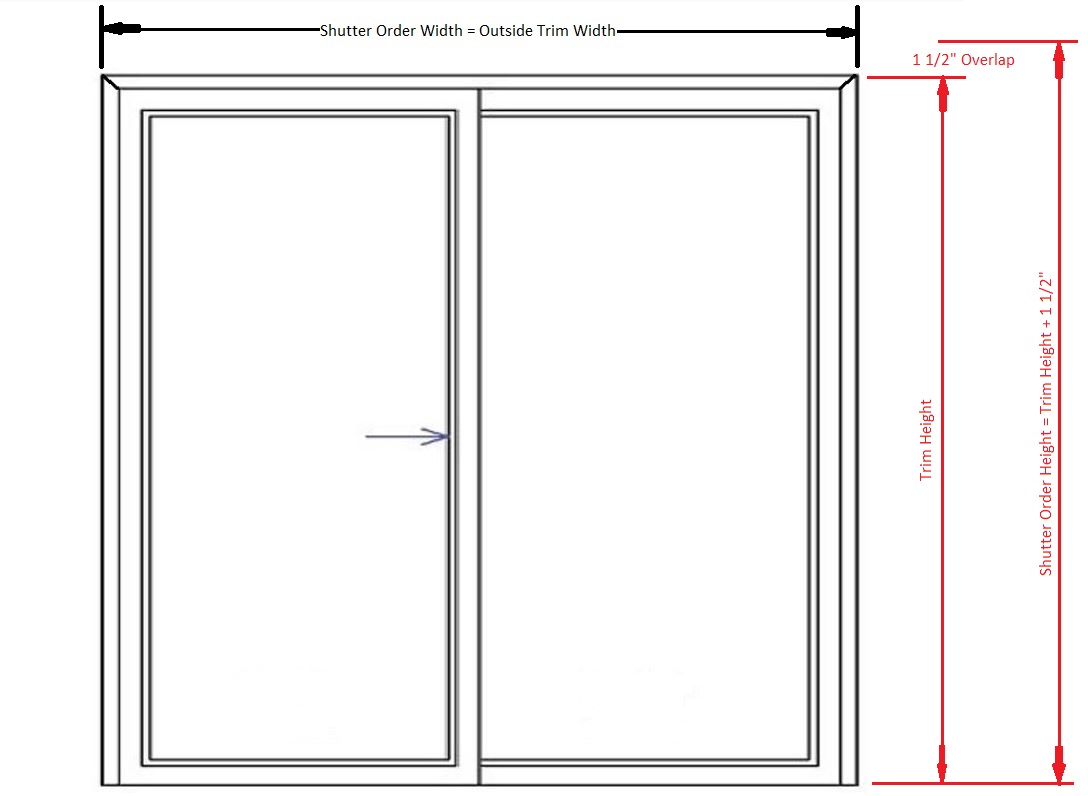
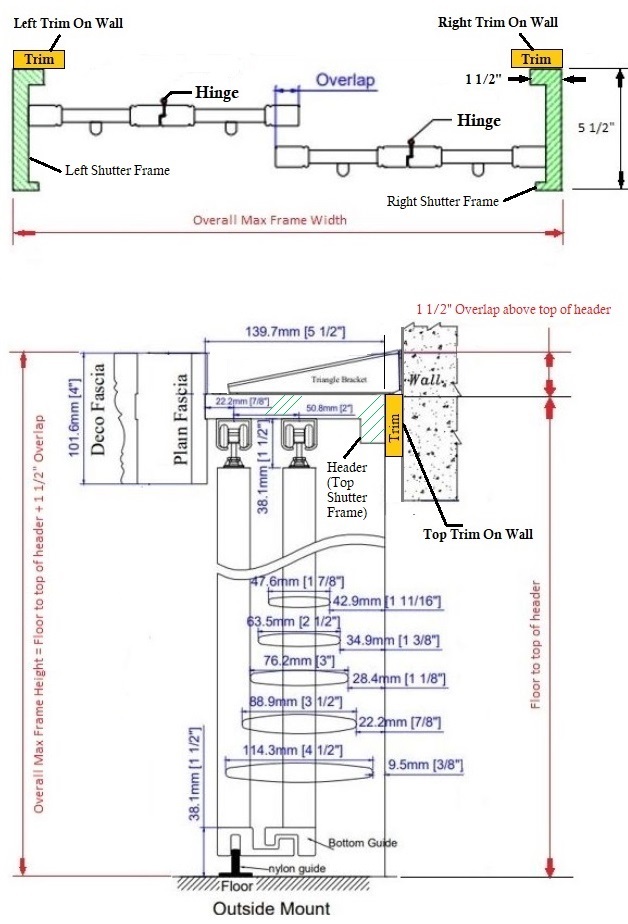
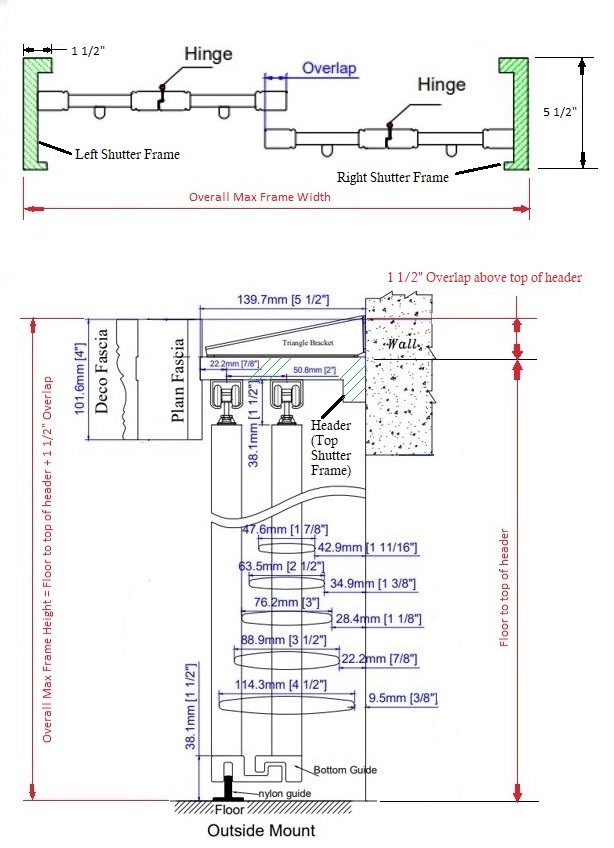
Sliding Bypass Shutters - Mounting On Existing Trim
Available Outside Mount Only. If you have trim around your door it is very common to mount the frame of the bypass shutter directly on top of the existing trim.
- Measure the exact width of the trim around the door. Enter the width of the trim as the width of your shutter. This will be the finished width of your shutter frame. You may add a slight overlap of 1/8" per side if you want your frame be a little larger than your trim.
- Measure the exact height of the trim around the door. Add 1 1/2" to the height for proper overlap. Enter this size as your height, this will be the finished total height of your shutter including proper overlap for the fascia on top to cover the mounting brackets. Do not make a deduction for clearance at the bottom of the panels. The panels will be slightly shorter than the frame size that you enter in order to have the needed clearance to slide properly.
- Make sure to account for any obstructions that may be in the area. When you order to mount on trim the fascia will come 3/8" longer on the sides to account for the thickness of the trim and go back to the wall. If your trim is slightly less than 3/8" you can trim to fit.
 Click to view larger
 Click to view larger
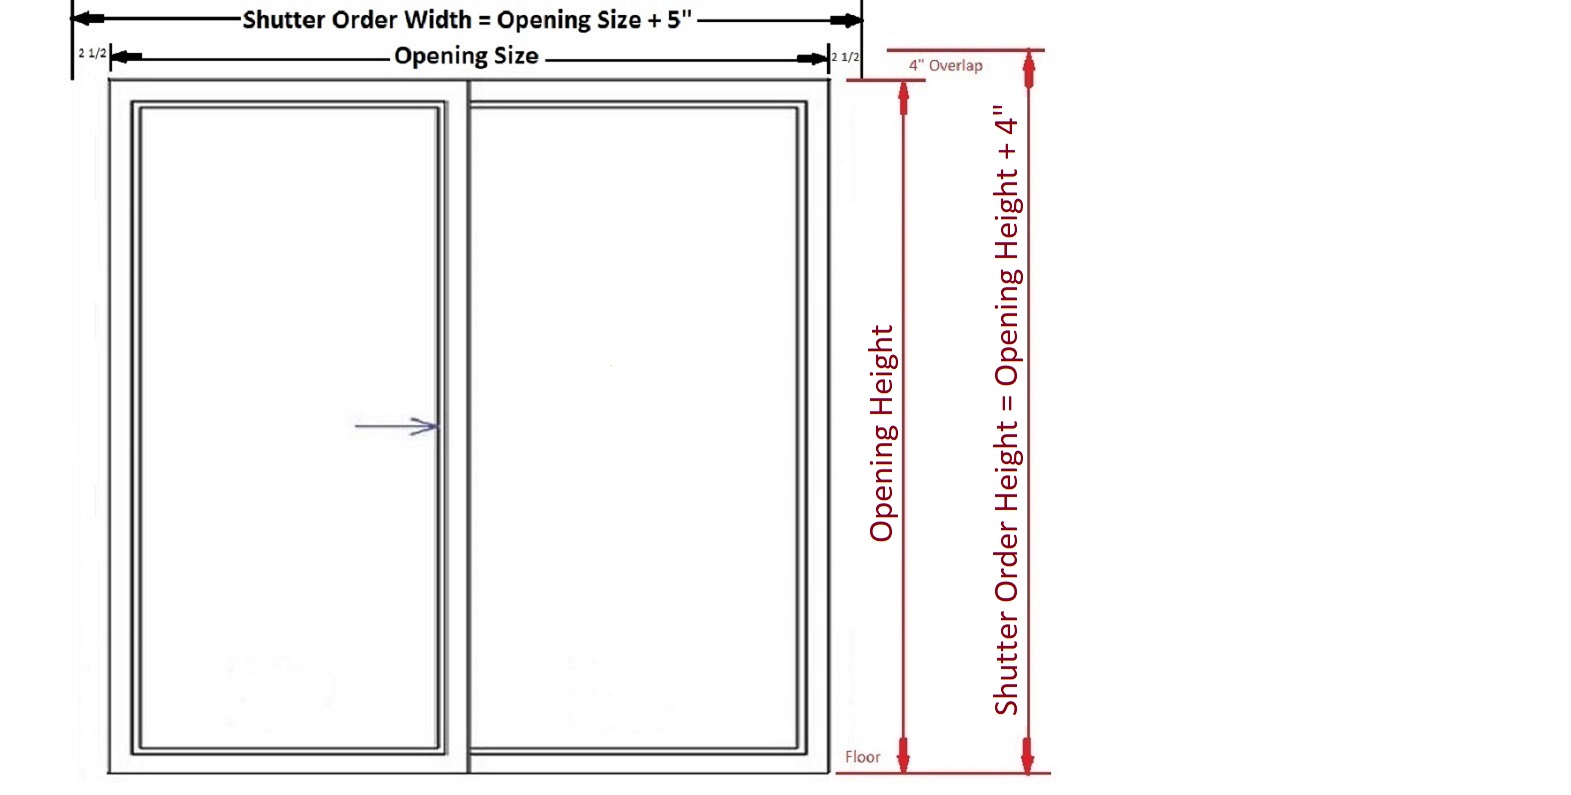
Sliding Bypass Shutters - Mounting On Wall No Existing Trim
Available Outside Mount Only. If you do not have trim around your door you will be mounting directly on the wall around the opening.
- Measure the exact width of the opening around the door. Add 2 1/2" per side (total of 5") to that size for proper overlap. Enter that size INCLUDING the overlap as your width. This will be finished width of your shutter frame.
- Measure the exact height of the trim around the door. Add 4" to the height for proper overlap. Enter this size as your height, this will be the finished total height of your shutter including proper overlap for the fascia on top to cover the mounting brackets. Do not make a deduction for clearance at the bottom of the panels. The panels will be slightly shorter than the frame size that you enter in order to have the needed clearance to slide properly.
- Make sure to account for any obstructions that may be in the area.
* Width and Height measurements may vary + / - 3/16" on all products. Direct Buy Blinds is not responsible for customer sizes or order entry errors, customer assumes full responsibility for all sizes entered. All products are custom made to order and production normally begins the day an order is placed. No changes or cancellations can be made once production has begun. Since ALL Direct Buy Blinds products are custom made to order they cannot be resold in the normal course of business and therefore cannot be returned for any reason.
- ©2026 Direct Buy Blinds. All rights reserved.